
The timeline
The timeline is the heart of Scene Cut. This is where subtitle timing takes shape, directly on the visual representation of the audio signal.
Playback and editing: two distinct modes
Before detailing each element, an essential point about how Scene Cut works: during playback, the timeline is not editable. Blocks cannot be moved, resized, or modified while the video is playing.
This is a deliberate choice. During playback, Scene Cut continuously synchronizes the video, audio, subtitles in the player, the prompter, and the blocks on the timeline -- everything moves together, frame by frame. Modifying a block during this continuous motion would create conflicts and inaccuracies.
The natural workflow therefore alternates between:
- Playback (
Space) -- to listen, spot cues, verify synchronization - Pause -- to edit, adjust, correct
It's a rhythm that quickly becomes natural: listen to a passage, pause, adjust, resume.
Interaction areas
The timeline is divided into two vertical zones with distinct behaviors:
Upper zone (above the blocks) -- selection area:
- Click in empty space to deselect all current entries
- Click-drag in empty space for marquee selection of multiple blocks at once
Cmd + clickon a block to add or remove a block from the selectionShift + clickon a block to select a range between the last selected block and this one- This is also where
Cmd + dragdraws a new subtitle
Lower zone (below the blocks) -- navigation area:
- Click-drag to scroll the timeline horizontally
- Lets you navigate the project without accidentally moving a block
Navigating the timeline:
- Mouse wheel or two fingers on the trackpad: scroll horizontally
Opt + click-drag: forces scrolling even above a block -- useful in busy areas- Pinch on trackpad: zoom in / zoom out
Opt + scrollorShift + scroll: zoom in / zoom out with the mouseCmd + scroll: adjust the waveform amplitude (audio gain)
This separation between selection area and navigation area prevents accidental edits.
Block interactions
Outside of playback, subtitle blocks can be manipulated directly:
| Action | Gesture |
|---|---|
| Select a block | Click |
| Move a block | Drag horizontally |
| Resize (start) | Pull the left edge |
| Resize (end) | Pull the right edge |
| Edit the text | Double-click |
| Split a block | Right-click > Split |
| Create a subtitle | Cmd + drag in empty space |
The ruler
The time bar above the waveform also serves as an interaction zone:
- Click: position the playhead
- Double-click or
Opt + click: add a scene cut Cmd + drag: define a loop region to replay a passage in a loop
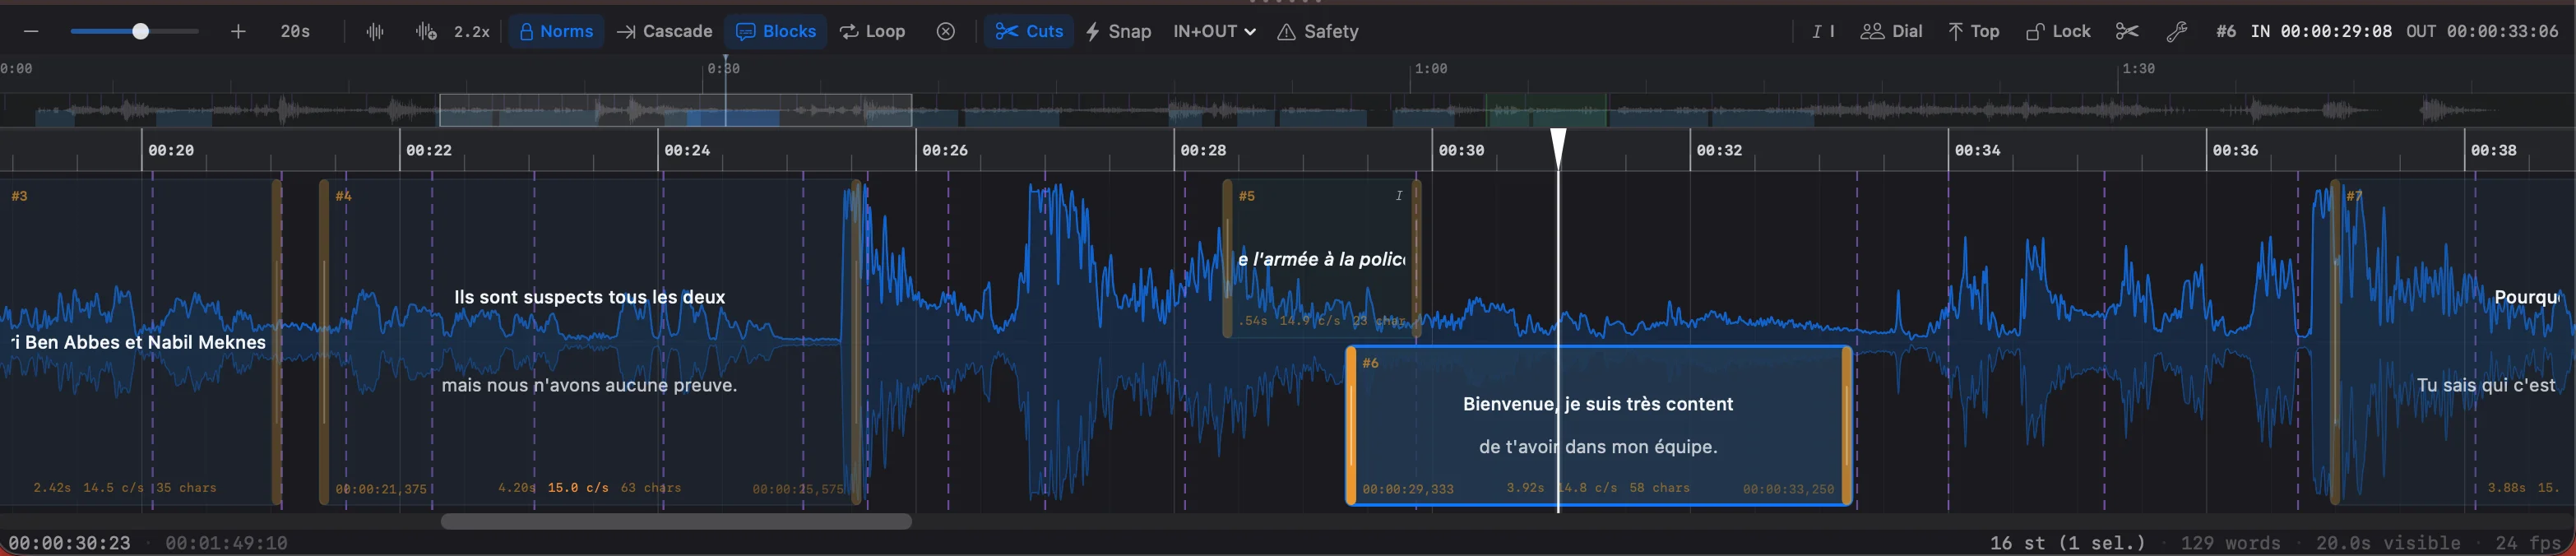
The waveform
The audio waveform fills the background of the timeline. It lets you visually identify moments of speech, silences, and transitions -- essential cues for placing subtitles at the right time.
The waveform amplitude can be adjusted (from 1x to 16x) to better distinguish low-volume passages.
Subtitle blocks
Each subtitle is represented by a colored block on the timeline. The block displays the entry number, the text, and a validation indicator on its left edge.
Blocks are manipulated directly with the mouse:
- Move a block by dragging it horizontally
- Resize by pulling the left or right edges
- Select with a click (Shift + click for multi-selection)
- Merge or split blocks via the timeline toolbar
Scene cuts
When an EDL file is imported or automatic scene cut detection is enabled, scene cuts appear as vertical markers on the timeline. Subtitles should never overlap a scene cut -- Scene Cut visually flags it when they do.
You can also add or remove scene cuts manually: the M key adds a marker at the playhead position, and right-clicking near an existing scene cut lets you delete it.
Zoom and navigation
The timeline toolbar offers several zoom levels:
- +/- buttons or shortcuts
W(zoom out) andE(zoom in) - Zoom slider for fine control
The zoom indicator displays the visible duration on screen (for example "5.0s" or "2m"), which helps you orient yourself in the time scale.
The minimap
The minimap is a reduced view of the entire project, displayed just above the waveform. It shows the current position in the project (white rectangle) and allows quick navigation by clicking or dragging.
Show or hide the minimap with Opt + Cmd + M or from the View menu.
Cmd displays a magnifying loupe -- handy for navigating precisely in a long project.Sections
When a project lasts an hour or more, it becomes hard to know where you are. Sections are an optional tracking tool that lets you mark the timeline into named zones -- for example "Intro", "Scene 3 dialogue", "Credits" -- to organize your work and visualize subtitling progress.
This is especially useful for subtitlers working on feature films or series, where a project spans multiple sessions. Sections make it easy to find where to pick up the work.
Creating and managing sections:
Cmd + dragon the sections bar to create a new one- Right-click on a section to rename or delete it
- Drag the edges of a section to adjust its duration
- Click on a section to position the playhead at its start
The sections bar can be shown or hidden at any time with Opt + Cmd + B or from the View menu. It has no effect on subtitle content -- it's a purely organizational tool.